GitHub の awslabs/aws-sdk-ios-samples リポジトリには AWS SDK for iOS を利用した以下のサンプルプロジェクトが用意されています
- CognitoAuth-Sample
- CognitoYourUserPools-Sample
- IoT-Sample
- Lex-Sample
- Polly-Sample
- S3TransferUtility-Sample
以下、それぞれを実行し、関連するコードを眺めます
CognitoAuth-Sample(Swift)
UI を実装せずとも SDK が提供するウェブビューベースでのサインアップ・サインインコンポーネントを利用して、手早く iOS アプリにユーザー認証の機能を追加できるサンプルが提供されています
セットアップ方法
- リポジトリをクローンして、依存ライブラリをインストール
- Announcing Your User Pools in Amazon Cognito に従い Cognito Identity Pool を作成
- アプリクライアントの設定を行う(詳細は README.md を参照)
- .xcworkspace を開く
- Info.plist を更新
- アプリを実行する
使ってみる
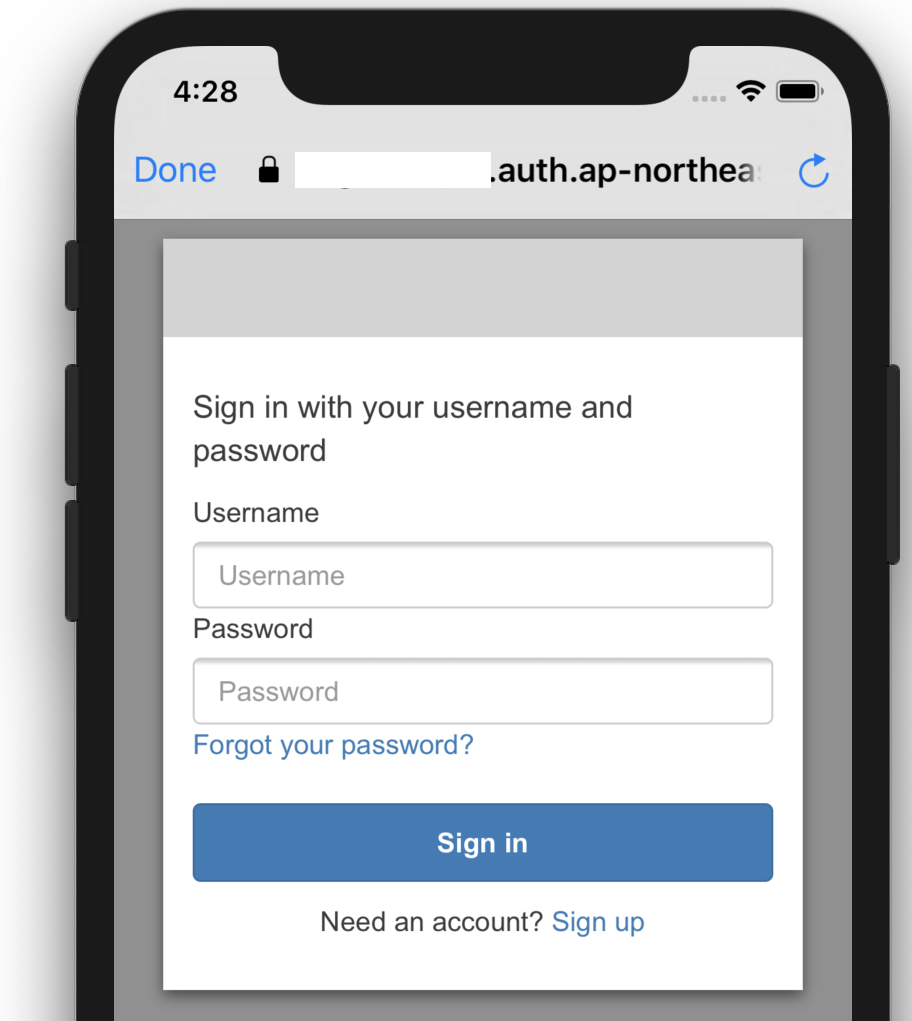
以下のように、起動するとまずログイン画面が表示されます
ユーザーが存在しないので、まずはサインアップを進めます。サインアップボタンを押し、ユーザー名、E メールアドレス、パスワードを入力すると、確認コードの記載されたメールが届きますので、アプリ上でそれを入力し、サインアップを完了させます

サインアップが完了したアカウントを利用してログインするとメタデータが表示されます

実装を見てみる
ViewController 的には AWSCognitoAuthDelegate の実装が必要なようです。とはいっても通常は単に self を返却すれば大丈夫です。
import UIKit
import AWSCognitoAuth

class ViewController: UITableViewController, AWSCognitoAuthDelegate {
...
    func getViewController() -> UIViewController {
        return self;
    }
...
あとはサインイン、サインアウトなどのイベント発生時に対応する API を呼ぶだけ
    @IBAction func signInTapped(_ sender: Any) {
        self.auth.getSession  { (session:AWSCognitoAuthUserSession?, error:Error?) in
            if(error != nil) {
                self.session = nil
                self.alertWithTitle("Error", message: (error! as NSError).userInfo["error"] as? String)
            }else {
                self.session = session
            }
            self.refresh()
        }

...

    @IBAction func signOutTapped(_ sender: Any) {
        self.auth.signOut { (error:Error?) in
            if(error != nil){
                self.alertWithTitle("Error", message: (error! as NSError).userInfo["error"] as? String)
            }else {
                self.session = nil
                self.alertWithTitle("Info", message: "Session completed successfully")
            }
            self.refresh()
        }
    }
また、ざっくりと良き塩梅にログイン状態は保持されます。
CognitoYourUserPools-Sample(Swift)
独自で UI を作成した場合の Cognito のサンプルコードです。
セットアップ方法
- リポジトリをクローンして、依存ライブラリをインストール
- Announcing Your User Pools in Amazon Cognito に従い Cognito Identity Pool を作成
- アプリクライアントの設定を行う(詳細は README.md を参照)
- .xcworkspace を開く
- Constants.swift を更新
- アプリを実行する
使ってみる
まずはサインアップの画面、そして検証コードの入力画面です。このようにしてユーザーを作成し、サインインの準備をします。


つづいて、作成したユーザーにてサインインを行うと、ユーザーのメタデータが表示されるサンプルとなっています。


実装を見てみる
- aws-sdk-ios-samples/CognitoYourUserPools-Sample/Swift/CognitoYourUserPoolsSample をみるとずらりと各 ViewController が並んでいます
- 基本的に画面をせかせか実装 + Cognito の対応する Delegate をあらかじめ実装しておき、対応する API を呼び出すみたいな流れです
サインインの部分だけをピックアップしてみてみます
aws-sdk-ios-samples/SignInViewController.swift
あらかじめ Delegate を実装しつつも...
extension SignInViewController: AWSCognitoIdentityPasswordAuthentication {
    public func getDetails(_ authenticationInput: AWSCognitoIdentityPasswordAuthenticationInput, passwordAuthenticationCompletionSource: AWSTaskCompletionSource<AWSCognitoIdentityPasswordAuthenticationDetails>) {
        self.passwordAuthenticationCompletion = passwordAuthenticationCompletionSource
        DispatchQueue.main.async {
            if (self.usernameText == nil) {
                self.usernameText = authenticationInput.lastKnownUsername
            }
        }
    }

    public func didCompleteStepWithError(_ error: Error?) {
        DispatchQueue.main.async {
            if let error = error as NSError? {
                let alertController = UIAlertController(title: error.userInfo["__type"] as? String,
                                                        message: error.userInfo["message"] as? String,
                                                        preferredStyle: .alert)
                let retryAction = UIAlertAction(title: "Retry", style: .default, handler: nil)
                alertController.addAction(retryAction)

                self.present(alertController, animated: true, completion:  nil)
            } else {
                self.username.text = nil
                self.dismiss(animated: true, completion: nil)
            }
        }
    }
}
ボタンによるサインインイベントのフックは以下のような具合
    @IBAction func signInPressed(_ sender: AnyObject) {
        if (self.username.text != nil && self.password.text != nil) {
            let authDetails = AWSCognitoIdentityPasswordAuthenticationDetails(username: self.username.text!, password: self.password.text! )
            self.passwordAuthenticationCompletion?.set(result: authDetails)
        } else {
            let alertController = UIAlertController(title: "Missing information",
                                                    message: "Please enter a valid user name and password",
                                                    preferredStyle: .alert)
            let retryAction = UIAlertAction(title: "Retry", style: .default, handler: nil)
            alertController.addAction(retryAction)
        }
    }
IoT-Sample(Swift)
セットアップ方法
- リポジトリをクローンして、依存ライブラリをインストール
- Cognito Identity Pool を作成
- Unauth_Role に AmazonLexRunBotsOnly をアタッチ
- .xcworkspace を開く
- awsconfiguration.json を更新
- Constants.swift を更新
- アプリを実行する
使ってみる
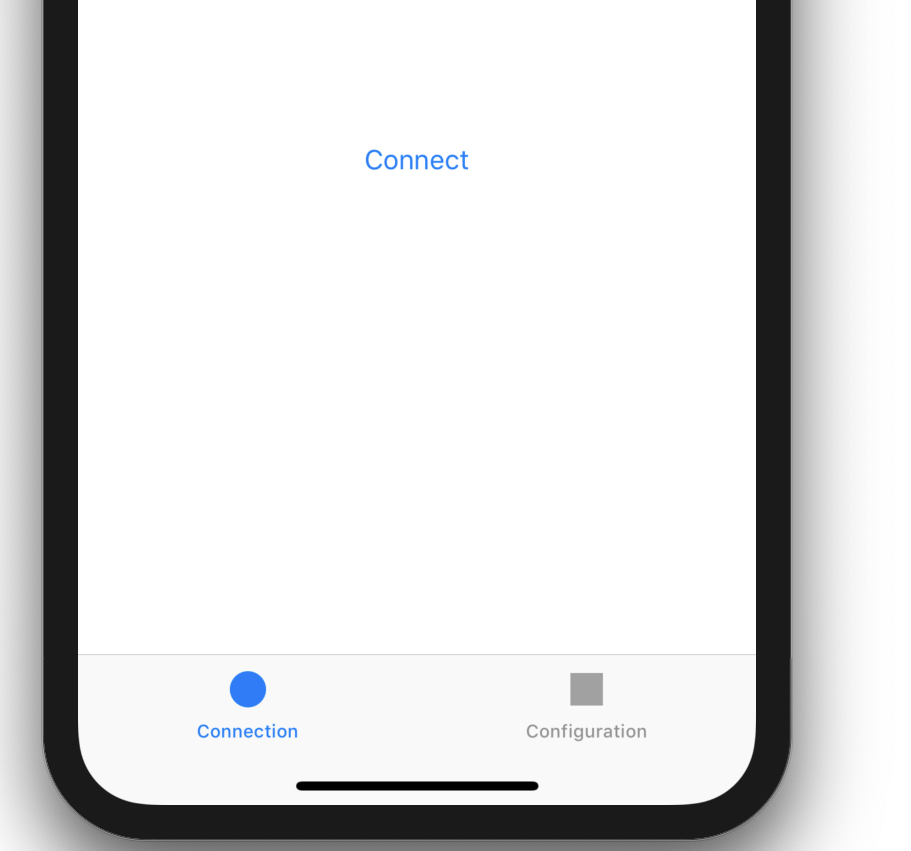
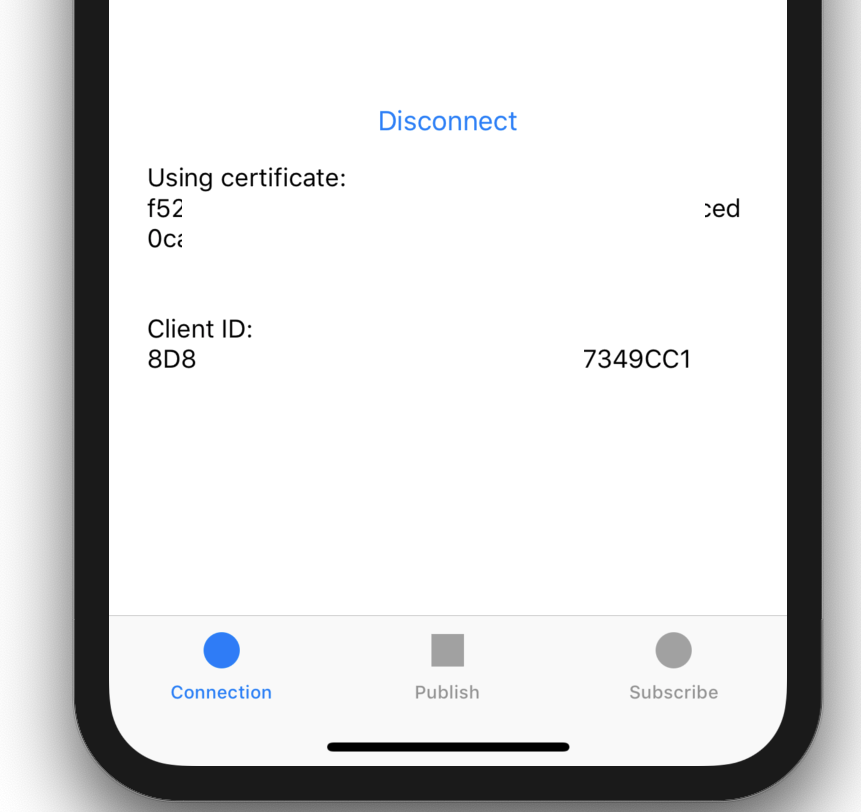
Connect ボタンを押すと必要な諸々の設定が始まり、接続が完了すると Disconnect ボタンが出現します(詳細はソースコード参照)
単体のシミュレータだとよくわからん状態になるので、動画をご覧ください。
[video width="640" height="360" m4v="https://static.53ningen.com/wp-content/uploads/2019/04/23013339/iot.m4v"][/video]
Publish と Subscribe をタブで切り替えられます。Subscriber は Publisher からのメッセージを受信してスライドバーが連動する簡単なデモアプリケーションになっています。
実装を見てみる
ConnectionViewController.swift
基本的には mqttEventCallback としてコールバック関数を定義して、iotDataManager.connect に渡すいうものになっています。複雑そうにみえますが、接続処理のフックと、各接続状態に応じた UI の制御を地味に書いていくような流れにみえます。
PublishViewController.swift
Publish 側の ViewController は単に sliderValueChanged イベントをフックして iotDataManager.publishString を対象のトピックに対して行っているだけです。
class PublishViewController: UIViewController {

    @IBOutlet weak var publishSlider: UISlider!

    @IBAction func sliderValueChanged(_ sender: UISlider) {
        print("Publish slider value: " + "\(sender.value)")

        let iotDataManager = AWSIoTDataManager(forKey: ASWIoTDataManager)
        let tabBarViewController = tabBarController as! IoTSampleTabBarController

        iotDataManager.publishString("\(sender.value)", onTopic:tabBarViewController.topic, qoS:.messageDeliveryAttemptedAtMostOnce)
    }
}
SubscribeViewController.swift
Subscriber 側も Publisher 側とほぼ同様の考え方で実装可能です
class SubscribeViewController: UIViewController {

    @IBOutlet weak var subscribeSlider: UISlider!

    override func viewDidLoad() {
        super.viewDidLoad()

        // Do any additional setup after loading the view, typically from a nib.
        subscribeSlider.isEnabled = false
    }

    override func viewWillAppear(_ animated: Bool) {
        let iotDataManager = AWSIoTDataManager(forKey: ASWIoTDataManager)
        let tabBarViewController = tabBarController as! IoTSampleTabBarController

        iotDataManager.subscribe(toTopic: tabBarViewController.topic, qoS: .messageDeliveryAttemptedAtMostOnce, messageCallback: {
            (payload) ->Void in
            let stringValue = NSString(data: payload, encoding: String.Encoding.utf8.rawValue)!

            print("received: \(stringValue)")
            DispatchQueue.main.async {
                self.subscribeSlider.value = stringValue.floatValue
            }
        } )
    }

    override func viewWillDisappear(_ animated: Bool) {
        let iotDataManager = AWSIoTDataManager(forKey: ASWIoTDataManager)
        let tabBarViewController = tabBarController as! IoTSampleTabBarController
        iotDataManager.unsubscribeTopic(tabBarViewController.topic)
    }
}
Lex-Sample(Swift)
音声やテキストを使用して、対話型のインターフェイスを構築できるサービス Amazon Lex を iOS アプリに組み込むサンプルリポジトリ。以下のような手順で簡単に試せます。
セットアップ方法
- リポジトリをクローンして、依存ライブラリをインストール
- Cognito Identity Pool を作成
- Unauth_Role に AmazonLexRunBotsOnly をアタッチ
- .xcworkspace を開く
- awsconfiguration.json を更新
- Constants.swift を更新
- アプリを実行する
使ってみる
こんな感じでチャット風にやりとりできる画面と音声入力でやりとりできる画面が用意されている

実装を見てみる
- AWSLexInteractionDelegate を実装すればよい形になっているので、何をすれば良いか自体は明確になっている
// MARK: Interaction Kit
extension ChatViewController: AWSLexInteractionDelegate {

    @objc public func interactionKitOnRecordingEnd(_ interactionKit: AWSLexInteractionKit, audioStream: Data, contentType: String) {
        DispatchQueue.main.async(execute: {
            let audioItem = JSQAudioMediaItem(data: audioStream)
            self.speechMessage = JSQMessage(senderId: ClientSenderId, displayName: ", media: audioItem)

            self.messages?[self.speechIndex] = self.speechMessage!
            self.finishSendingMessage(animated: true)
        })
    }

    public func interactionKit(_ interactionKit: AWSLexInteractionKit, onError error: Error) {
        //do nothing for now.
    }

    public func interactionKit(_ interactionKit: AWSLexInteractionKit, switchModeInput: AWSLexSwitchModeInput, completionSource: AWSTaskCompletionSource<AWSLexSwitchModeResponse>?) {
        self.sessionAttributes = switchModeInput.sessionAttributes
        DispatchQueue.main.async(execute: {
            let message: JSQMessage
            if (switchModeInput.dialogState == AWSLexDialogState.readyForFulfillment) {
                if let slots = switchModeInput.slots {
                    message = JSQMessage(senderId: ServerSenderId, senderDisplayName: ", date: Date(), text: "Slots:
\(slots)")
                    self.messages?.append(message)
                    self.finishSendingMessage(animated: true)
                }
            } else {
                message = JSQMessage(senderId: ServerSenderId, senderDisplayName: ", date: Date(), text: switchModeInput.outputText!)
                self.messages?.append(message)
                self.finishSendingMessage(animated: true)
            }
        })
        let switchModeResponse = AWSLexSwitchModeResponse()
        switchModeResponse.interactionMode = AWSLexInteractionMode.text
        switchModeResponse.sessionAttributes = switchModeInput.sessionAttributes
        completionSource?.set(result: switchModeResponse)
    }

    func interactionKitContinue(withText interactionKit: AWSLexInteractionKit, completionSource: AWSTaskCompletionSource<NSString>) {
        textModeSwitchingCompletion = completionSource
    }
}
Polly-Sample(Swift)
ディプラーニングを使用したリアルな音声の読み上げサービスを iOS アプリに組み込むサンプルリポジトリ。以下のような手順で簡単に試せます。
セットアップ方法
- リポジトリをクローンして、依存ライブラリをインストール
- Cognito Identity Pool を作成
- Unauth_Role に AmazonPollyFullAccess をアタッチ
- .xcworkspace を開く
- awsconfiguration.json を更新
- アプリを実行する
Cognito Identity Pool はマネジメントコンソールを触るのが面倒であれば amplify CLI を使って手軽に作成できます。
$ amplify init
$ amplify add auth
# 特定の選択肢に対しては下記のように選択し、Unauth ロールが生成されるようにする
# Do you want to use the default authentication and security configuration? Default configuration with Social Provider (Federation)
...
# Do you want to use the default authentication and security configuration? Manual configuration
...

$ amplify push
使ってみる
スクショのようにボイスと読み上げたいテキストを入力して、ボタンをおすと読み上げてくれる簡単なサンプルになっています

実装を見てみる
ざっくりと以下のような流れ
- AWSPollySynthesizeSpeechURLBuilderRequest にて読み上げを行いたいテキストや取得するオーディオファイルのフォーマット、ボイスを選択する
- getPreSignedURL にてオーディオファイルの署名付き URL を取得できるので AVPlayer に投げて音声の再生を行う
   @IBAction func buttonClicked(_ sender: AnyObject) {
        let input = AWSPollySynthesizeSpeechURLBuilderRequest()
        if textField.text != " {
            input.text = textField.text!
        } else {
            input.text = textField.placeholder!
        }
        input.outputFormat = AWSPollyOutputFormat.mp3
        input.voiceId = selectedVoice

        let builder = AWSPollySynthesizeSpeechURLBuilder.default().getPreSignedURL(input)
        builder.continueOnSuccessWith { (awsTask: AWSTask<NSURL>) -> Any? in
            let url = awsTask.result!

            self.audioPlayer.replaceCurrentItem(with: AVPlayerItem(url: url as URL))
            self.audioPlayer.play()

            return nil
        }
    }
S3TransferUtility-Sample(Swift)
セットアップ方法
- リポジトリをクローンして、依存ライブラリをインストール
- amplify init
- amplify push
- amplify add storage
- amplify push
- .xcworkspace を開く
- アプリを実行する
使ってみる
画像のアップロード、およびダウンロードができます


実装を見てみる
DownloadViewController.swift
AWSS3TransferUtility.default().downloadData によりダウンロードを行いつつ、プログレスの取り扱いも記述されたサンプルコードになっている
    @IBAction func start(_ sender: UIButton) {
        DispatchQueue.main.async(execute: {
            self.statusLabel.text = "
            self.progressView.progress = 0
        })

        self.imageView.image = nil;

        let expression = AWSS3TransferUtilityDownloadExpression()
        expression.progressBlock = {(task, progress) in
            DispatchQueue.main.async(execute: {
                if (self.progressView.progress < Float(progress.fractionCompleted)) {
                    self.progressView.progress = Float(progress.fractionCompleted)
                }
            })
        }

        self.completionHandler = { (task, location, data, error) -> Void in
            DispatchQueue.main.async(execute: {
                if let error = error {
                    NSLog("Failed with error: \(error)")
                    self.statusLabel.text = "Failed"
                }
                else if(self.progressView.progress != 1.0) {
                    self.statusLabel.text = "Failed"
                }
                else{
                    self.statusLabel.text = "Success"
                    self.imageView.image = UIImage(data: data!)
                }
            })
        }

        transferUtility.downloadData(
            forKey: S3DownloadKeyName,
            expression: expression,
            completionHandler: completionHandler).continueWith { (task) -> AnyObject? in
                if let error = task.error {
                    NSLog("Error: %@",error.localizedDescription);
                    DispatchQueue.main.async(execute: {
                        self.statusLabel.text = "Failed"
                    })
                }

                if let _ = task.result {
                    DispatchQueue.main.async(execute: {
                        self.statusLabel.text = "Downloading..."
                    })
                    NSLog("Download Starting!")
                    // Do something with uploadTask.
                }
                return nil;
            }
    }
UploadViewController.swift
AWSS3TransferUtility.default().uploadData をたたいて、Download とおなじような形で Upload も扱える
    @objc func uploadImage(with data: Data) {
        let expression = AWSS3TransferUtilityUploadExpression()
        expression.progressBlock = progressBlock

        DispatchQueue.main.async(execute: {
            self.statusLabel.text = "
            self.progressView.progress = 0
        })

        transferUtility.uploadData(
            data,
            key: S3UploadKeyName,
            contentType: "image/png",
            expression: expression,
            completionHandler: completionHandler).continueWith { (task) -> AnyObject? in
                if let error = task.error {
                    print("Error: \(error.localizedDescription)")

                    DispatchQueue.main.async {
                        self.statusLabel.text = "Failed"
                    }
                }

                if let _ = task.result {

                    DispatchQueue.main.async {
                        self.statusLabel.text = "Uploading..."
                        print("Upload Starting!")
                    }

                    // Do something with uploadTask.
                }

                return nil;
        }
    }
ライセンス表記
本記事中に登場するソースコードのライセンスは Apache License 2.0 です。
Pinned Articles
About
ウェブ界隈でエンジニアとして労働活動に励んでいる @gomi_ningen 個人のブログです
Tags
LLM
promptfoo
GenAI
JavaScript
PowerShell
kibana
fluentd
elasticsearch
nginx
村川梨衣
五十嵐裕美
イベント
logrotate
IoT
Java
Scala
iputils
C言語
ICMP
WUG
mastodon
Swift
AWS
Clock
Windows
アーキテクチャ
PoEAA
iOS
DeviceFarm
プログラミング言語
OS
Lambda
StepFunctions
Serverless
terraform
ポエム
RHEL
ネットワーク
GraphQL
CloudWatch
Linux
Coreutils
telnet
network
nc
LinuxKernel
fpinscala
ELB
IAM
AppSync